

Welcome to the TTRR personal blog. This post shares my personal experience with setting up hexo and deploying it to github. This site’s image hosting is based overseas, so you’ll need a VPN to view images smoothly
Blog Tips
Step 1: Download node.js
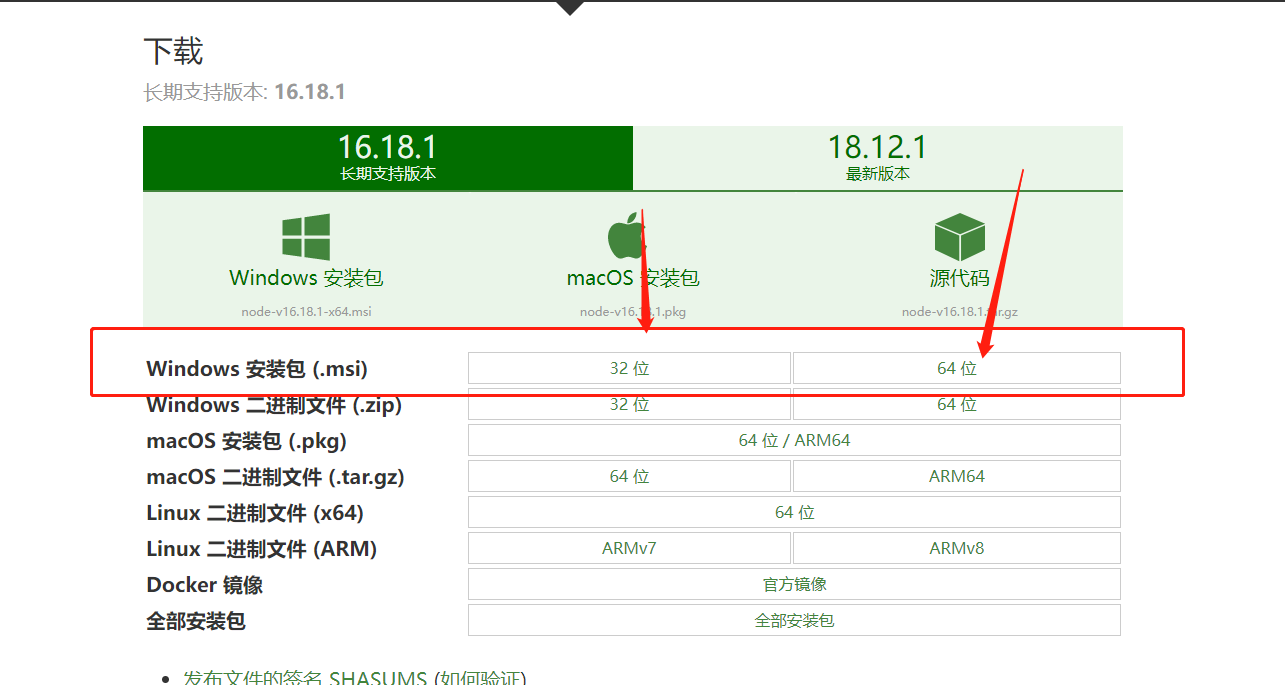
Install node.js 1. Download the node.js installer according to your setup environment. (Shown here as windows)
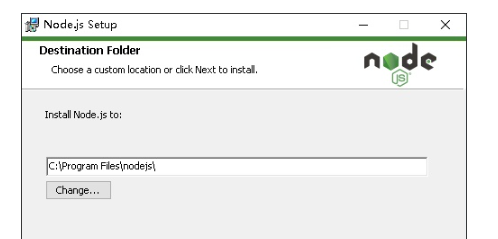
- It is recommended to install to the C drive. (Node.js doesn’t take up much space anyway.)
-
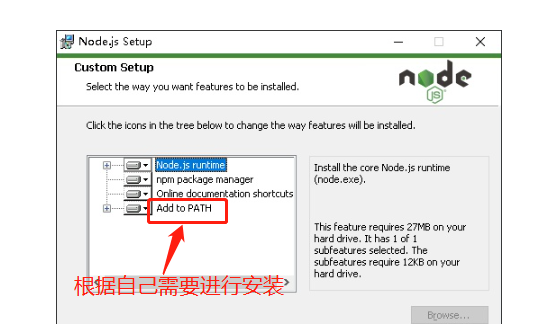
Here, select the last option, Add to PATH, to install. (Because we’ll need this PATH feature later, I won’t go into detail here)
-
From here on, just keep clicking Next until the installation finishes.
Step 2: Download Git
Install the Lanzou Cloud version of Git Download Git directly from the official website
Friendly reminder: If the link won’t open, try the following steps Ⅰ. Change lanzoui.com to lanzous.com in the link Ⅱ. Remove www You can install Git into any folder you like (install it wherever you want~)
-
- Next, just keep clicking Next (there’s nothing for us to configure)
-
- After installation, right-click on the desktop and you’ll see Git

xxxxxxxxxx - [ ] This is a small cross - [x] This is a red check {.danger} - [ ] Not done - [x] Done {.primary} - [ ] Not done - [x] Default color text
After installation, right-click on the desktop and click Git Bash Here. A terminal will open, and we run the following commands to check
code snippetto check whether we installed it successfully. (It usually never fails, but just in case.) Successful example:

Configure cnpm
- Install cnpm by running the following command
$ npm install -g cnpm --registry=https://registry.npm.taobao.orgcnpm is essentially a domestic mirror, used to make your access faster
- Check the cnpm installation
$ cnpm -vAs long as a version number appears, your installation went fine (if it errored, just try again)
Install hexo and initialize
- Still in the git bash terminal, enter the following command
$ cnpm install hexo-cli -gInitialize our blog
- You’ll need to create a folder (you can name it anything)
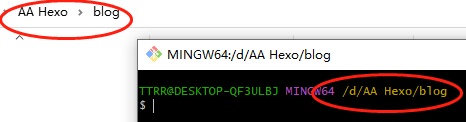
- For example, create a blog folder on the F drive, and open Git bash in that folder

Tip: Once opened, your current folder will be displayed here
Clone the files
- Run the following command to clone (you can also call it initialization)
hexo initBecause this clone downloads from the external network, it may time out or error. Just wait patiently; if it really doesn’t work, use a VPN/proxy to speed it up. (Actually, I feel it’s fast enough without a proxy — though that might be because my network connection is good.)
- Keep going until the terminal shows
Install dependencies; if it gets stuck, pressCtrl + cto end it. - Next, run the following command to install dependencies
$ cnpm install- Once the command finishes, our blog clone is complete. We can run the following command for a temporary preview
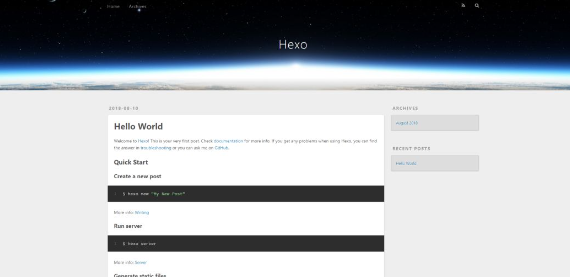
$ hexo s
Note: Don’t use
Ctrl + cto copy — useShift + insinstead (If you still can’t access it, use thehexo servercommand to preview)
And just like that, the default theme is set up!
Step 4: Choose a theme you like
hexo Theme download
You can find all the hexo themes here and pick one you like
As you can see, there are many themes on this page
It contains the following three things
- Preview link
- Project link
- Configuration link
Click a theme’s image to open its preview link, click a theme’s title to open its project link, and find the configuration docs at the project link
Tip: Most of it is in English~ You can use Google Chrome or Edge’s page translation feature
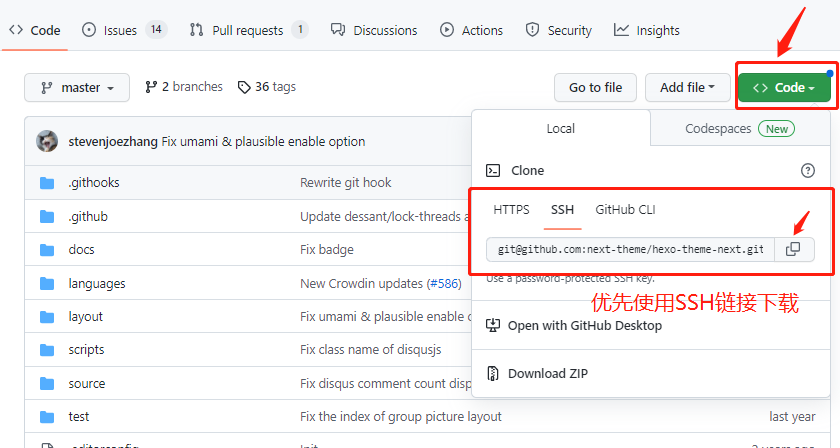
- First, let’s click the theme’s project link to enter (Using the theme NEXT as the default example here)

We can see there’s a link under Clone or download. Let’s copy it first — we’ll need it when cloning the files.
Start cloning the theme
- First, open our Git bash in your blog directory
git clone 主题项目复制的地址 themes/主题名字Tip: themes is a folder under your blog directory. As for the theme name, you can actually name it anything, though English is best for easy remembering
If you keep failing to clone the theme via Git bash, you can choose Download ZIP under Clone or download
After downloading, extract it and put it into the themes directory under your blog folder, and you’re good
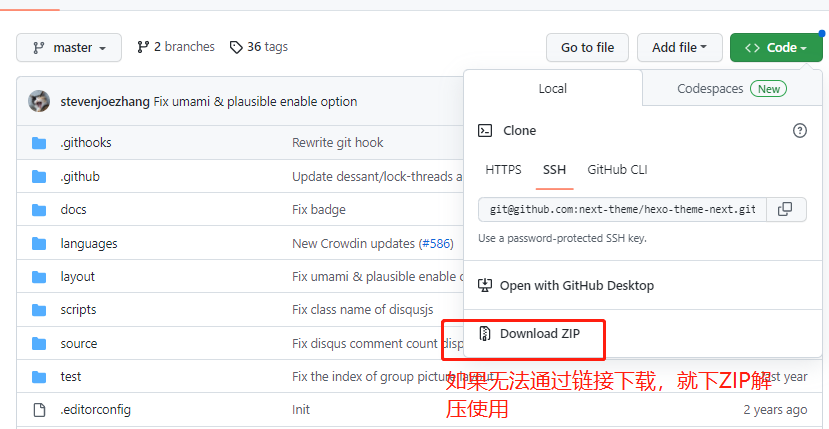
Tip: You need to log in to your GitHub account to download~ ~
Configure the theme
- In the blog directory there’s a file named
_config.yml. Let’s open it
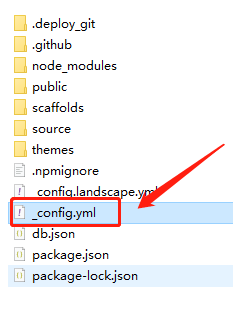
- Then scroll down to find
themeand modify it to the name of the theme folder you just downloaded into the themes directory under your blog directory
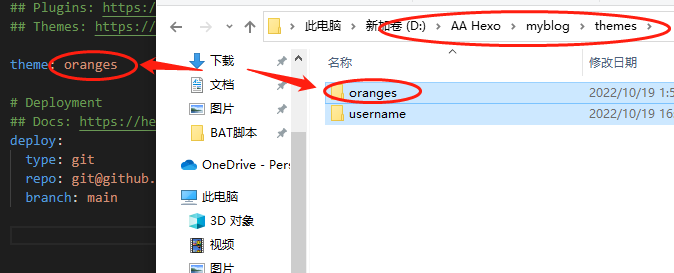
- Once that’s done, you can preview the theme you just downloaded. Open
Git bashin your blog directory and run the following command
hexo s- After running it, you’ll see a URL. Remember, don’t use
ctrl + cto copy~ ~ - You can select that link and right-click to choose
copy; usingctrl + cwill stop the preview
Some themes can’t be previewed after you switch to them, but it will tell you that you need to install something or other. You’ll need to install it — generally, it’s mostly pug and other plugins. Exactly which one depends on what your theme requires, so download accordingly. In general, when you preview, it will usually give you a download link telling you to install this thing, and once the installation finishes you can preview your blog. If you don’t understand, leave a comment and I’ll help you when I see it.
Start modifying the theme
First, you’ll see a
_config.ymlin the root of your blog directory, and then in themes under your blog directory you’ll see an identical-looking_config.yml. Although they share the same name, don’t ever mix them up.
- The
_config.ymlin the root of the blog directory - The
_config.ymlunder the theme’s themes directory You need to learn to tell them apart.
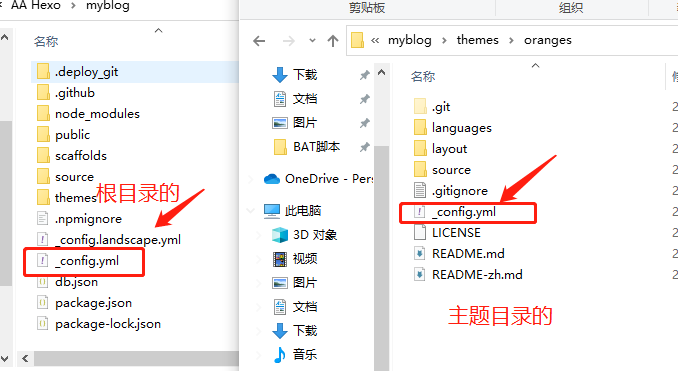
- Let’s take a look at what’s inside the
_config.ymlin the root of the blog directory - The first thing you’ll see is this. I’ve kindly added comments for those who aren’t great at English.
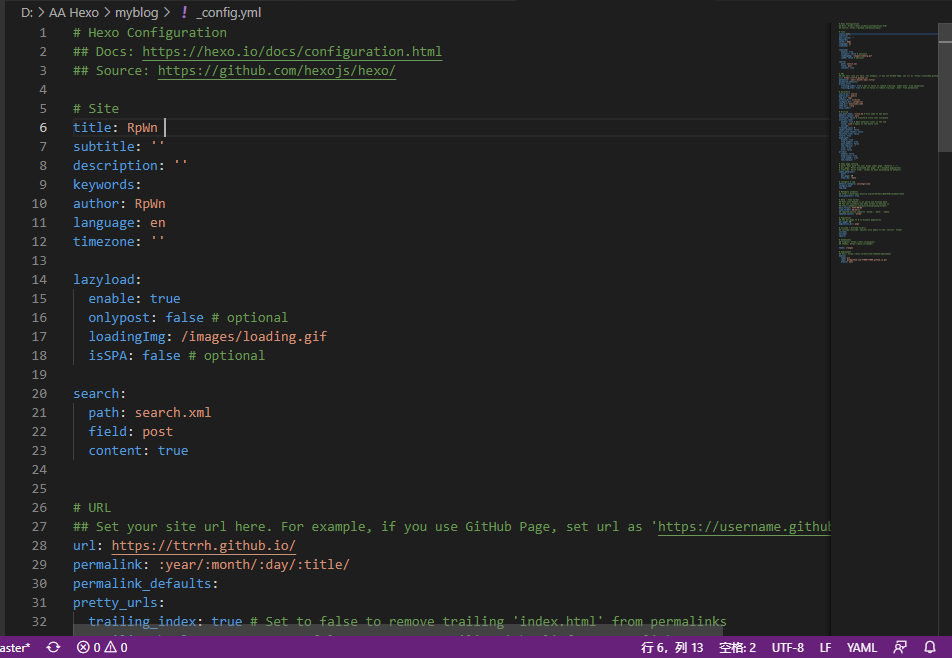
- Next, let’s look at what’s inside the
_config.ymlunder the theme’s themes directory - When you open it, the first thing you’ll likely see is what’s shown below. It contains the theme’s detailed configuration and comments (though they may be in English, you can use a translator)
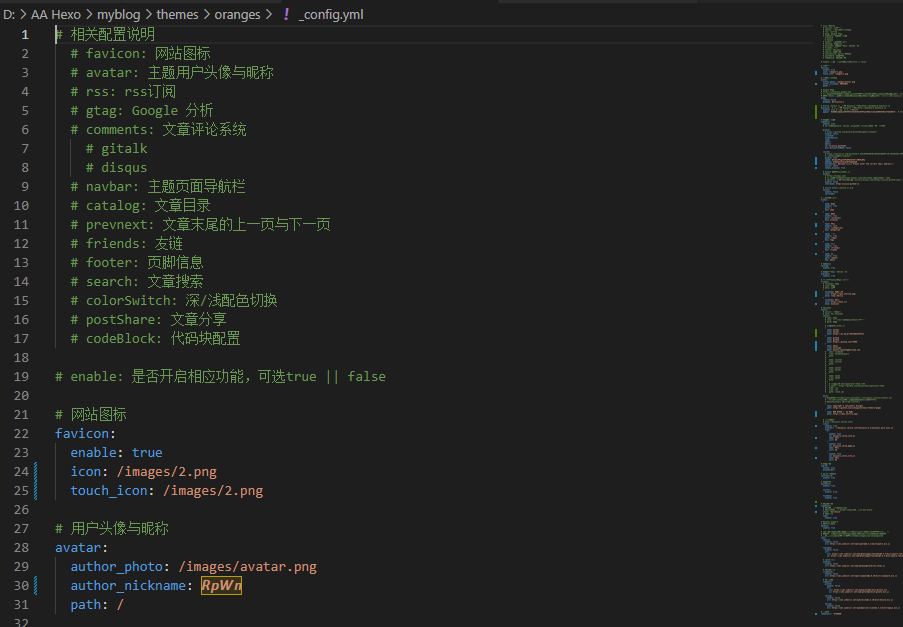
Can you tell the difference between these two
_config.ymlfiles at a glance now? (If not, practice makes perfect!)
-
As for the specific theme configuration, I’ll only give a brief introduction — most of it is modified in the
_config.ymlunder the theme’s themes directory -
The following are some simple hexo commands
-
Create a new post
hexo new "我的第一个博客"- After creation, each generated post is fixed in the source/_posts directory under your blog root
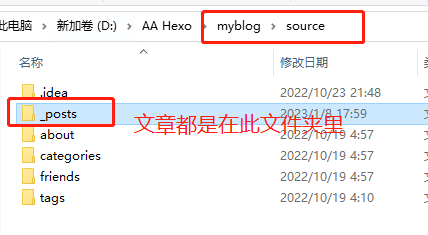
Tip: The generated
.mdfile is your blog post. You can find it in source/_posts under your blog root and open it for editing. Not sure what to do after you open it?? After reading my blog —————— anyone can do it.

Deploy and publish
Generate blog posts
- The
.mdfile we generate for our blog post — a quick Baidu search reveals this is Markdown, so head over to the Runoob Tutorial to learn some Markdown With a bit of learning, you can easily publish your blog posts.
For an editing tool, just Baidu it and you’ll easily find one; I use Visual Studio Code
Deploy the blog with github
I prefer git deployment here, so let’s use that as the example. Other deployment methods like gitee and GitLab will be added over time
- Log in to our github account
(If you don’t have one, register — since it’s an overseas site, access might be a bit slow)
- Create a new repository
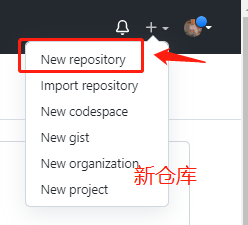
- The repository name must be
用户名 + .github.io

Create a git key
- Next, we need to create a
Gitkey. Open git bash (no particular directory required) and run the following command:
ssh-keygen -t rsa -C "你的邮箱"Whatever appears when you run the above command, just confirm it — for example, it may prompt you with: [Y/N], in which case you need to type Y, then just press Enter to confirm the rest
- Then run the following command
cat ~/.ssh/id_rsa.pubIt will output your key, and you need to copy it.
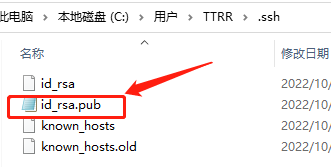
The generated key is located in id_rsa.pub inside .shh:
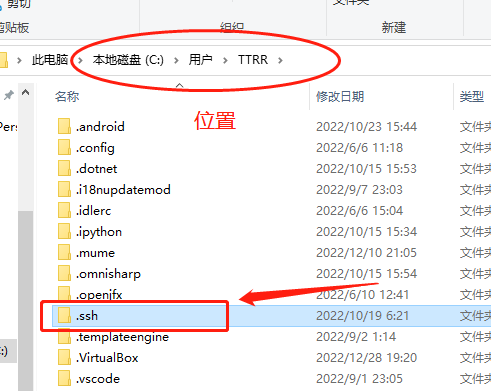
- Go back to our github, click your avatar to enter, then click
Settings--SSHon the left andNew SSH Keyon the right

The title can be anything, paste your key into key, then click Add SSH key and you’re done
If you switch computers, you’ll need to regenerate your key and bind it again~
Link git and prepare to deploy
- Next, open
Git bashand run the following command:
ssh -T [email protected]If the connection succeeds, you’ll see the following:
Are you sure you want to continue connecting (yes/no/[fingerprint])? Just type yes
If you keep getting Error and time out errors while connecting, please use an accelerator or a VPN/proxy When you succeed, it will show:
helo TTRR,you are successful*******
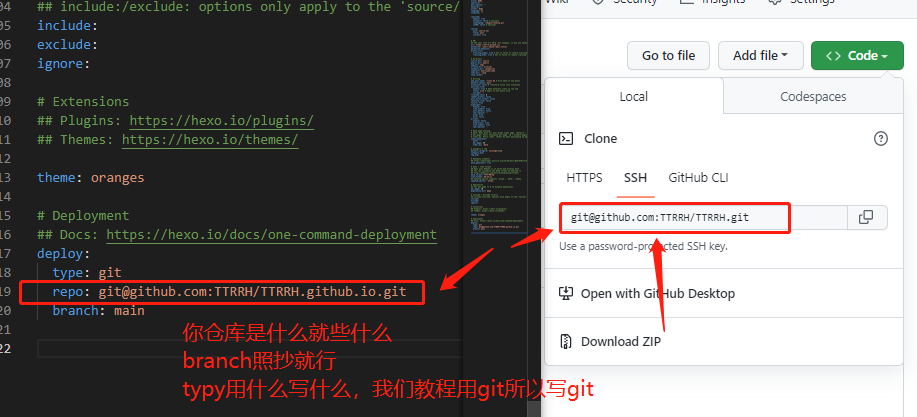
- Open the project we created, select
ssh, and copy it — we’ll use it in a moment

- Open the
_config.ymlin our blog root, scroll to the very bottom, and you’ll see the following:
deploy:
  type: git
  repo: 你复制的地址
branch: mian- Next, run the following commands in our blog root directory:
git config --global user.name "你的github用户名"
git config --global user.email "你注册github的邮箱"
Then run the following command to install the upload plugin:
cnpm install hexo-deployer-git --saveInstalling the upload plugin usually doesn’t throw an
Error. If it does, just run it again. If you repeatedly fail to install it or keep getting errors, join my TG group and I’ll help you out
Deploy the blog
- After completing all the steps above, do the final deploy and upload by running the following command:
hexo g -dConfigure github
Generate the blog link
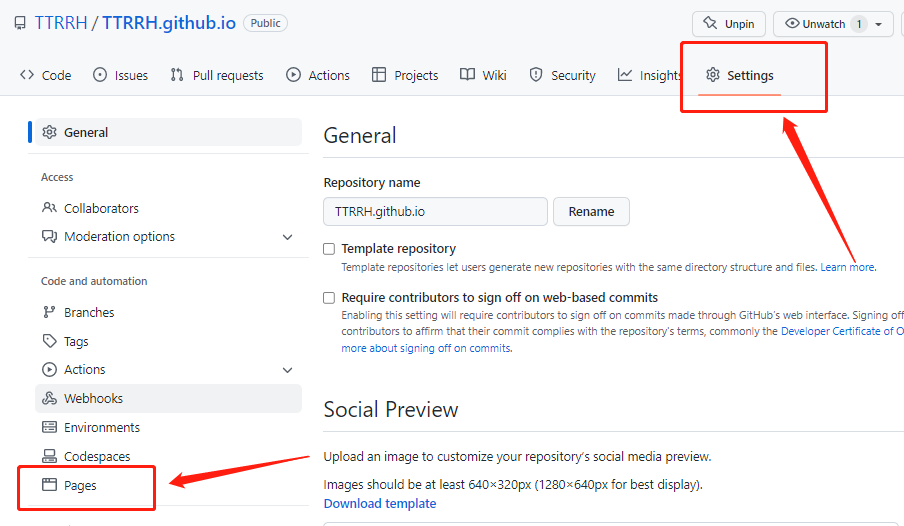
- Open our blog project and click
Settings - Scroll down to find
Github pages
- Select
mainas the branch, then save
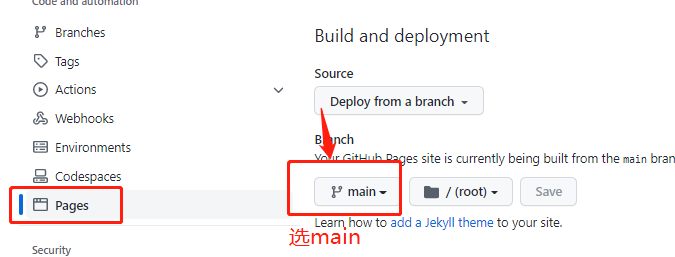
Finally, we get our blog link!!
If you have any questions, feel free to leave a comment~
If you enjoyed this, leave a comment~